What is Listar?
Listar is an electronic mailing list program that distributes email to everyone on a list. The mailing list is owned and managed by one person, and members on the list may be able to post to the list or make changes to their settings. Listar distributes email, handles routine subscription requests, and provides basic information about the list on request.
Mailing lists are mananged by the list owner, assisted by the Listar program. As a list owner, you are responsible for adding and removing people from the list. You can do this using the web interface or via email.
This article contains instructions for list owners on how to configure and administer a list. If you want to subscribe to an existing list, or are a member of a Listar list and want to know how to do things on that list, please refer to Belonging to a Listar Mailing List. That article also contains information on how to communicate with the Listar program via email.
Requesting a Listar List
Any member of the SSCC may request that a list be created simply by completing the on-line form or contacting the Help Desk. The email address you provide will be the only one with administrative rights for the list, so please make a note of the exact address that you used. Once you receive a confirmation from an SSCC staff memeber that the list has been created, you can follow the instructions in this document to subscribe users, configure the list, and carry out other administrative functions.
Please note that, as with all modes of electronic communication at SSCC, email lists are to be used for research and educational purposes only. State law forbids that public communications facilities be used for partisan political purposes or in ways that could be interpreted as harassing or discriminatory.
How to Use the Web Interface
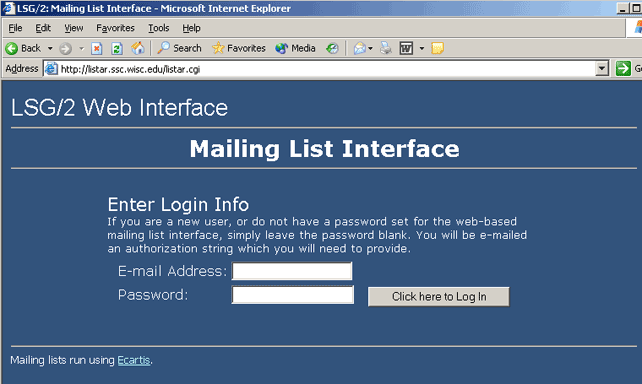
To work with the Listar web interface, you first need to get a password to log in. To do that, go to the web interface page. You will see something like:

Enter your complete email address, such as username@ssc.wisc.edu, not just the username. Your email address is the way the program knows you and can identify which lists you belong to and your status on each of those lists. You will only have administrative options available to you for lists for which your email address has administrator status.
Press the Click here to Log In button, and leave the password field blank. Listar will send an email message with a password you can use to the address you gave. This password will only be valid for 3 days, so be sure to change your password as soon as you connect.
Log in again with the same email address (the password will not work if you use a different address). Use the Copy and Paste function to fill in the password that Listar sent you. Click on the Authorize button.
This will bring you to the main menu. The first thing to do here is to go to the bottom right of the page and change your password. The one you set will not expire.
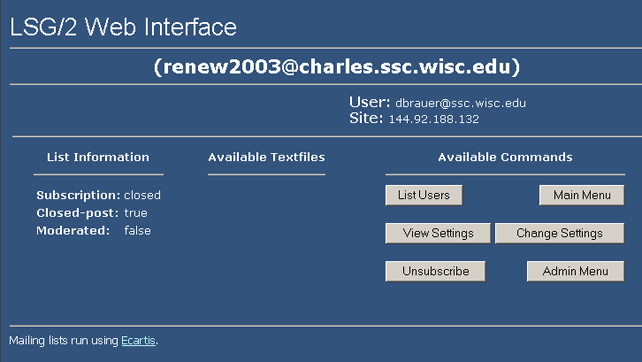
The other thing you can do on this page is see all the Listar lists that SSCC has, and choose the one you want to work with. Highlight the desired list and choose Select List. This will bring you to a page with a number of choices, like this:

The Admin Menu button, at the lower right, will only be available if you are listed as an administrator of the list. The Main menu is the page that you were just on. List Users will show you all addresses on the list, and their settings and activity. View Settings will show you the settings for your email address on this particular list. Change Settings offers a variety of settings that list members may change on their own, that only pertain to their email address on this list. Unsubscribe will allow a user to unsubscribe their email address for the particular list. Depending on the administrative settings, this may be automatic, refused, or sent to the list administrator for approval.
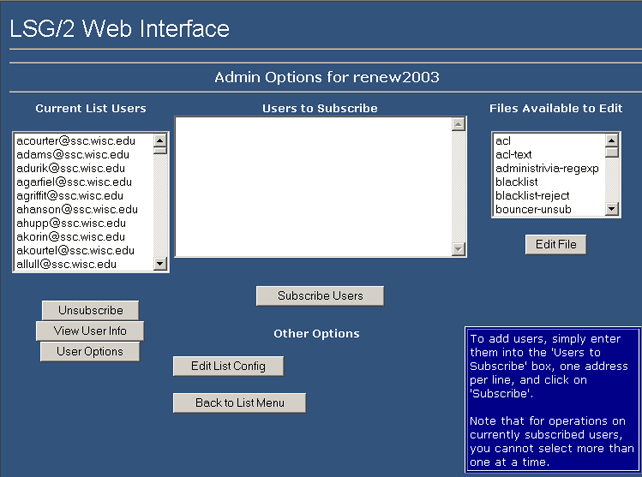
To work with your list, click on the Admin Menu button. That will open the administrative window.

You can subscribe list members by typing their email addresses in the middle box labelled Users to Subscribe, and then clicking Subscribe Users when all are listed. You can also copy a list of users and paste that list into the window, as long as each address is on a separate line and there are no separating characters such as commas between addresses.
To unsubscribe list members, you can highlight an email address and then click the Unsubscribe button. You will have to remove each email address individually. If you want to remove a number of email addresses at once, consider using the email interface described in Belonging to a Listar Mailing List.
User Options
If you want to change the settings for an individual list member, highlight the email address and click the User Options button. This will open a new window with a variety of settings. Each setting has an associated explanation. Just check the ones you want, and uncheck the ones you do not want. List members who are not list administrators can set some of these options, others must be set by the list administrator. Any list member can choose their own settings for the Ackpost, Digest, Digest2, Echopost, Hidden and Vacation settings.
Edit File
There are a number of messages that Listar can send out automatically. If you belong to other lists, you may be familiar with welcome messages, for example. These messages are stored as text files. The Files Available to Edit pane contains a list of all the files that you, as list administrator, can edit. Most of them are empty files, and will need to be edited if you turn on the option to send that type of message or Listar will just send out a blank email.
Configuration Options
The owner and administrator of a Listart mailing list can set a large number of variables relating to the list's configuration. To do this, click on Edit List Config, and you will enter a very long menu of choices. Most of these do not need to be changed and the defaults are fine. There are a few that depend on the purpose and structure of the list. You should go through these and be sure the settings work well for your list.
Items to Configure for Your List
Basic Configuration: Default Flags. This is where you can set the various flags that will be applied to all subscribed addresses. For example, if you use the list to distribute information and do not want members replying to the list, you might want to set [NOPOST] as a default flag. You should set this before subscribing addresses to the list because they will not be applied to addresses that were subscribed before you set them.
Basic Configuration: Subject Tag. You can use this variable to insert some text into the Subject line of each email to identify that the mail came from the list. This can be particularly useful if list members want to generate email filters to move mail from the list into a particular mailbox.
Bounce Handling. As the list administrator, you will be notified whenever Listar is unable to deliver mail to a particular email address. If you want to drop members from the list after their email is undeliverable for a certian number of times, you may want to set some variables in this section.
Misc: Closed Post. Check this variable if you only want list members to be able to post to your list.
Misc: closed-post-blackhole. This variable is for closed lists only. Check it if want messages submitted to a closed-post list by non-members to get thrown away. Checking this box may help keep a lot of spam out of your inbox.
Moderation. There are a number of options here that will affect what information gets to you as the administrator and moderator, and what actions you will have to take to allow changes to occur. It might be helpful to read through the choices and make sure they suit you. Pay particular attention to moderated, admin-approvepost, and moderator-approvepost.
Subscribe Options: Admin-Subscribe-Notice. If this is set to Silent, no notice will go out when someone is subscribed to the list. If it is set to Welcome, the welcome message (which you will have to create) will be sent out. If it is set to Notify, the member will just be told they have been subscribed to the list.
Search for closed-post-blackhole, make sure box is checked, click Save Configuration
There are other options, and as list administrator, you can set any of them. If you are not sure what something does but want to try it, please make a note of what setting you changed, and what the previous value was. Then you can always go back.
Take the time to look over all these options when you first create your list. Getting it configured right from the beginning will save you a lot of time administering it.
Last Revised: 5/4/2007